How to sew a button back on, by hand
In this guide
The button is in your hand, or in your pocket, or rolling somewhere under the bed, and the shirt or coat is otherwise perfectly good. Learning how to sew a button takes about ten minutes the first time and five after that, and it is one of the few repairs where doing it yourself gives a result as strong as a tailor's. It is also the natural first step toward other simple fixes, such as hemming pants. A button sewn on carefully by hand often outlasts the factory stitching around it.
The method depends on the button. Flat buttons with two or four holes are sewn through the holes, with a short column of thread underneath called a thread shank. Shank buttons have a loop on the back instead and are sewn through that. Both finish with the same secure knot. Before you start, check the inside of the garment near the care label or the bottom of a shirt placket for a spare button; many shirts and coats come with one.
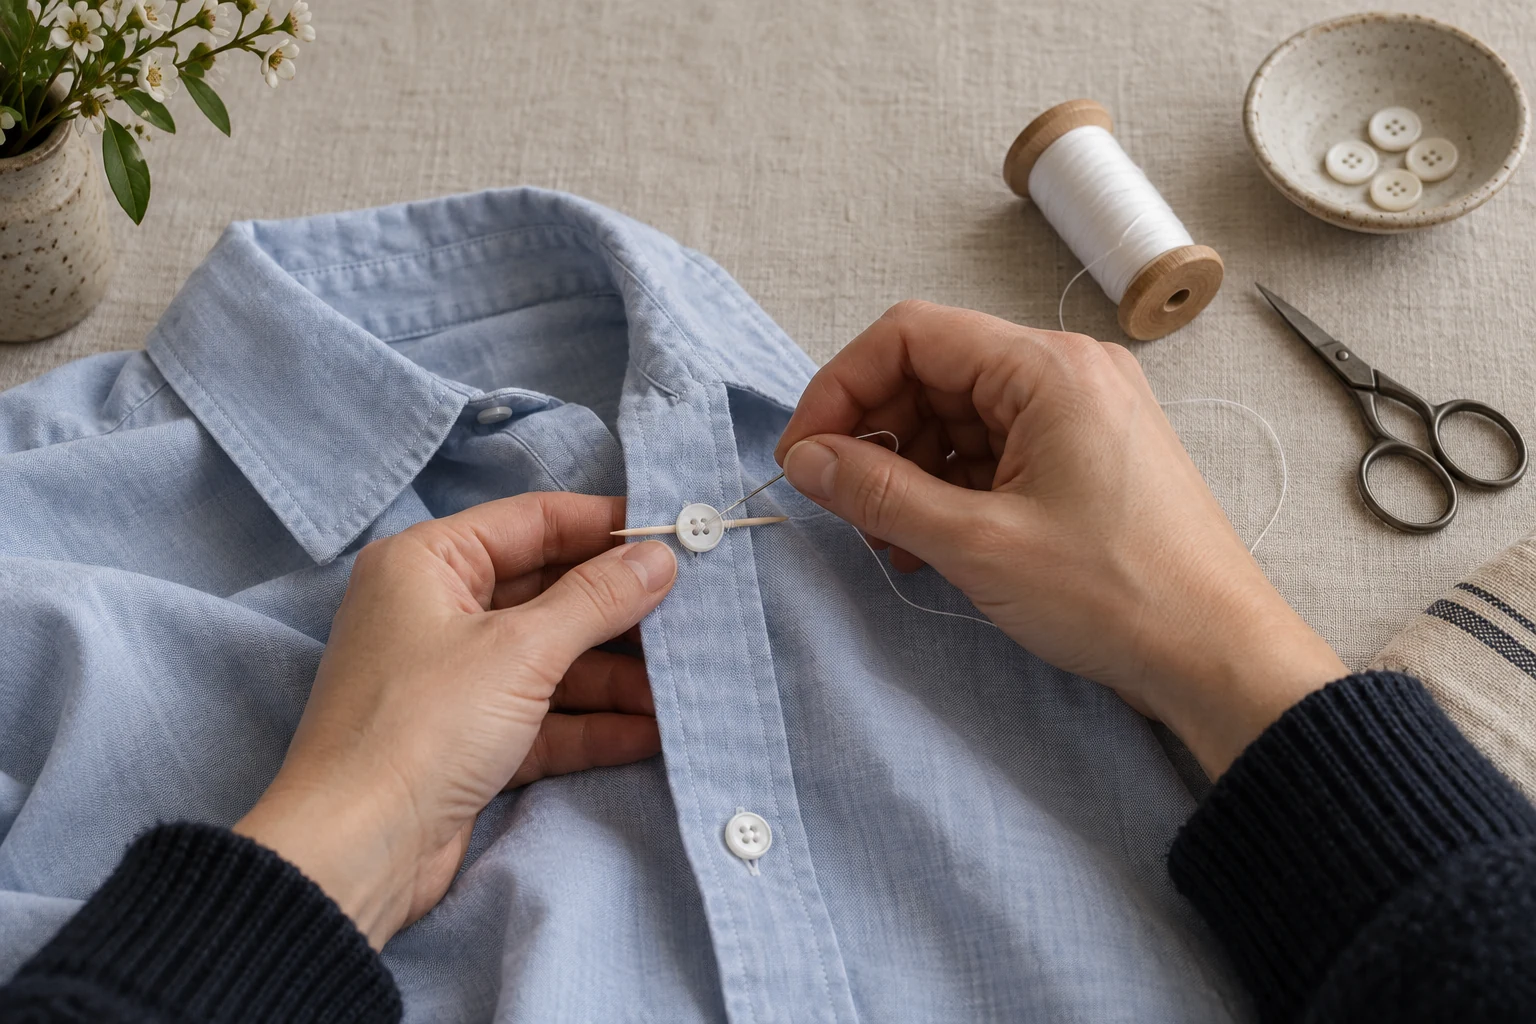
What you need
You need a hand sewing needle with an eye large enough to thread easily, thread that matches the other buttons rather than the fabric, small scissors, and a spacer such as a toothpick or a straight pin. All purpose polyester or cotton thread is fine for shirts, blouses and trousers. For coats, jackets and heavy knits, a stronger button or upholstery thread holds up better. The University of Florida's extension guide suggests cutting about 16 inches (40 cm) of thread, threading the needle and pulling the two tails even so you sew with a doubled strand, then tying the tails together in a knot. A doubled thread builds strength quickly with fewer passes.
Mark the exact spot
If the button has just fallen off, the old stitch holes and a few thread ends usually show exactly where it belongs. Pull out any loose threads so they do not get caught in the new stitching. If the marks are gone, button the garment closed using the buttons above and below, push a pin through the buttonhole into the fabric underneath, and mark the spot. For a horizontal buttonhole, the button sits at the end of the hole nearest the garment's edge; for a vertical buttonhole, as on most shirt plackets, it sits on the center line just below the top end of the hole.
Getting this right matters more than the stitching. A button even a quarter inch (6 mm) out of line pulls the front of a shirt into a diagonal ripple when it is done up, and it is much easier to measure twice than to cut the button off and start over.
Make the thread shank and tie off
The thread shank is the short column of thread between the button and the fabric, and it is the step most people skip. It gives the buttonhole side of the garment room to sit under the button, which takes the strain off the stitches and stops the fabric around the button from puckering. As a rule of thumb, the shank should be about as long as the fabric around the buttonhole is thick: very short on a shirt, noticeably longer on a wool coat.
Wrap the shank
With the needle between the button and the fabric, wind the thread firmly around the stitches under the button four to six times. You should feel it tighten into a firm stem that holds the button up.
Take the needle to the back
Push the needle down through the fabric right at the base of the shank, so it comes out on the inside of the garment among the first stitches.
Tie the finishing knot
Take a tiny stitch through the stitches on the back, and before pulling it tight pass the needle through the loop it forms, then pull. Repeat two or three times in the same spot.
CheckThe thread should not slide when you tug it.
Trim and test
Cut the thread a little way from the knot rather than flush against it. Button the garment and check that it closes flat without pulling the fabric sideways.
| Button | Where you find it | How to attach it |
|---|---|---|
| Two hole | Most shirts and small flat buttons | Six to eight passes over a toothpick, then wrap a shank |
| Four hole | Shirts, trousers, coats | An X or two parallel bars over a spacer, matching the others |
| Shank button | Coats, blazers, cardigans, many dresses | Several passes through the loop, no spacer, loop in line with the buttonhole |
| Jeans tack button | Most jeans waistbands | No sew replacement kit, or a tailor |
On heavy coats, a small flat button stitched behind the outer one spreads the strain.
Common mistakes
Sewing the button down flat
Without a thread shank, the buttonhole side has no room, so every fastening strains the threads and the fabric bunches. Always use a spacer on flat buttons, especially on coats.
Pulling each stitch tight
Tight stitches pucker the fabric and leave no slack to form the shank. Keep an even, moderate tension and let the spacer set the height.
Using a thread that is far too long
Long thread tangles and knots on itself. A strand of about 16 inches, doubled, is enough for one button.
Finishing with a single knot on the surface
One knot can slip back through the fabric. Tie off with two or three small locking stitches through the thread on the back.
Questions people ask
How do I sew a button on a shirt so it matches the others?
Look at a neighboring button first. Note whether its stitches form an X or two parallel bars, and whether they run vertically or horizontally, and copy them. Match the thread color to the other buttons, and keep the shank short because shirt fabric is thin; a pin works better than a toothpick as a spacer here. If the collar button keeps popping off, the collar may simply be too tight, and our guide to finding your dress shirt size explains how to check.
How many times should I stitch through the holes?
With doubled thread, six to eight passes through each pair of holes is secure for most clothing. Heavier garments and buttons that take a lot of strain, such as a coat's top button or a waistband, benefit from a few more. More passes than the holes can comfortably hold only make the button harder to fasten.
How do I sew a one hole button?
A button with a single hole running through a raised back is a form of shank button, and it is sewn the same way. Pass the needle through the hole and back into the fabric several times, then knot off on the inside.
How do I sew a button on a sweater or cardigan?
Knit fabric stretches and can tear under a button, so spread the strain. Sew through a small flat button or a scrap of felt placed on the inside, directly behind the outer button, and pass the needle between the yarns rather than splitting them. Keep the tension gentle so the knit does not pucker. If the knit around the old button has already opened into a hole, close it first as described in our guide to fixing a hole in a sweater.
Can I sew a button with regular thread?
Yes. All purpose polyester thread is strong enough for shirts, blouses and trousers, especially when doubled. For coats, heavy knits and waistbands, a thicker button or upholstery thread lasts longer.
Should I sew a button by hand or by machine?
Many sewing machines can attach flat buttons with a zigzag stitch set to zero length, which is quick for a whole row. For a single replacement, hand sewing is faster to set up and lets you build a proper thread shank, and shank buttons can only be sewn by hand.
Sources and further reading
References used for this guide. Each opens the original page in a new tab.
Keep reading

Suits and tailoring
Suit button rules: which buttons to fasten
Suit jacket button rules for two button, three button and double breasted jackets: which button to fasten, why the bottom stays open, and what to do when you sit.
Washing and ironing
How to wash jeans and how often to do it
How to wash jeans so they keep their color and fit: how often to wash, inside out in cold water, air drying, raw denim and what to do if your jeans shrink.
Suits and tailoring
How to find your dress shirt size: neck and sleeve
Read any dress shirt size chart with confidence: how to measure your neck and sleeve, what 15.5 34/35 means, how to check a collar, and slim vs classic fit.

Suits and tailoring
How a suit should fit: shoulders, sleeves and length
How should a suit fit? Check the shoulders, collar, button, jacket length, sleeves and trousers in the mirror, and learn which problems a tailor can and cannot fix.
Washing and ironing
How to iron a shirt in the right order
How to iron a shirt the way shirtmakers do: set the heat for the fabric, start slightly damp, then work collar, cuffs, sleeves, yoke, back and front in order.