How to tie a tie on someone else
In this guide
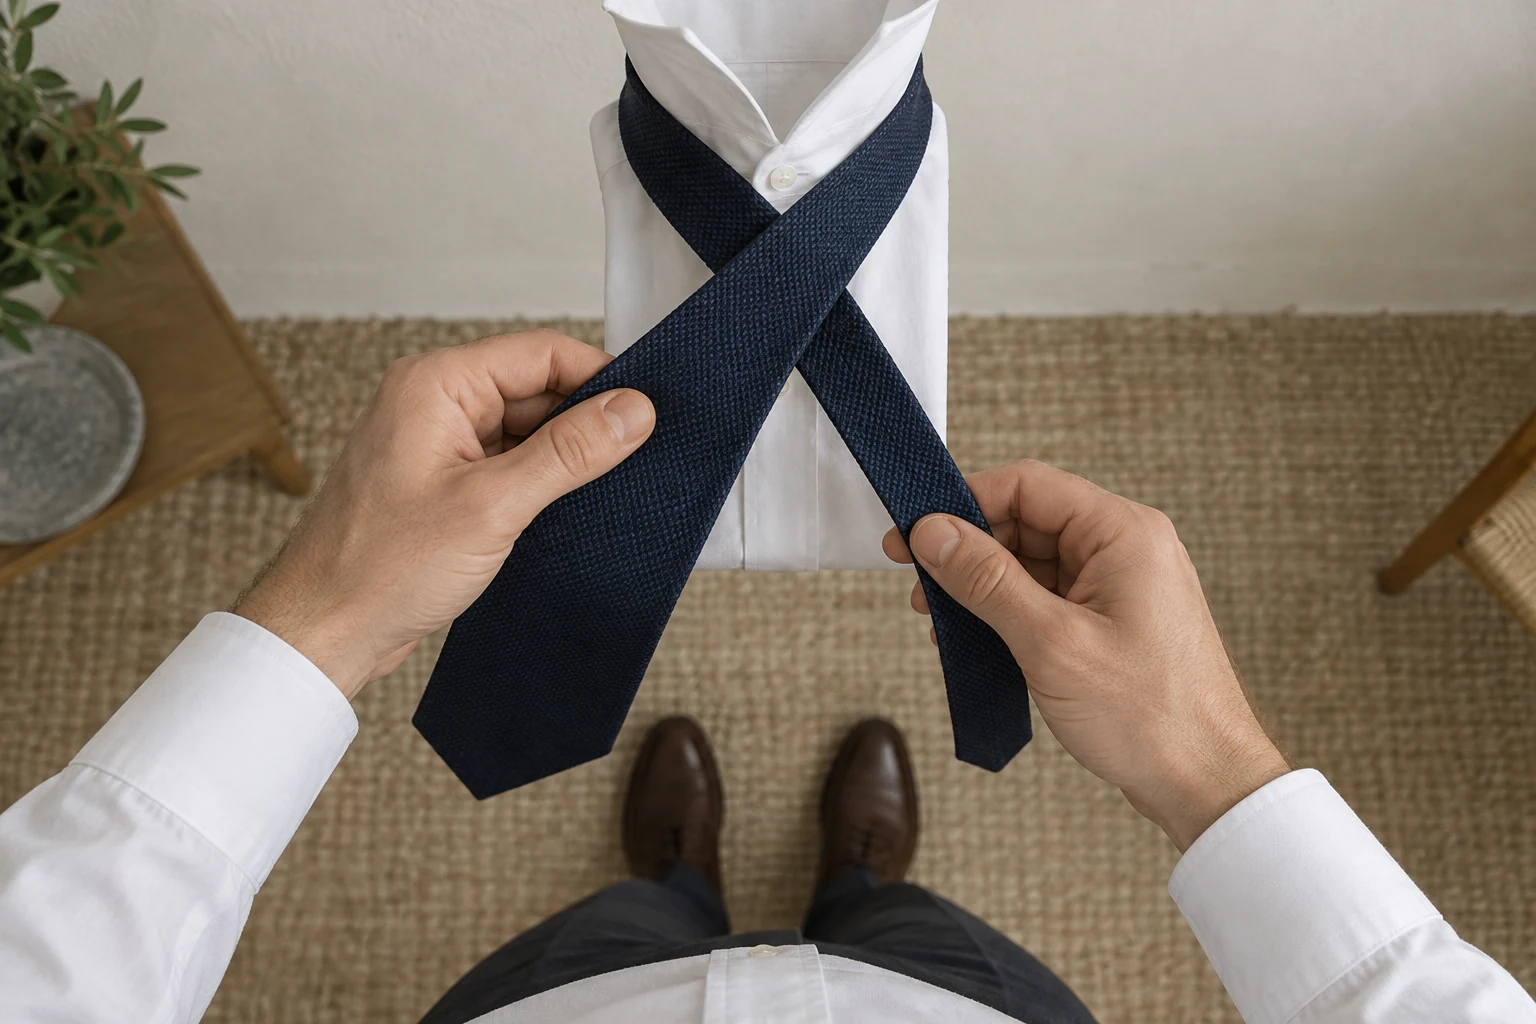
It is the morning of a wedding and the groom's brother is holding his tie out to you. Or your son has a recital in twenty minutes and a tie he has never worn. You tie your own without thinking, yet the moment you stand in front of someone else your hands seem to belong to a stranger. That is not clumsiness. The knot lives in your hands as a sequence seen from your own chest, and facing another person turns that picture around.
There are three good ways to handle it, and each suits a different moment. Standing behind the wearer lets you use your habit unchanged. Facing them is quicker once you know how to translate each move. Tying the knot on yourself and handing it over avoids the problem entirely. The steps below use the four in hand, the simplest dependable knot, but the same thinking applies to any knot you already know.

Why tying a tie on someone else feels backwards
When you tie your own tie, the wide end starts on your right, crosses to your left, and every move is described from your chest outward. Face another person and two things flip at once. Their right side is now on your left, and the front of the tie faces you instead of pointing away from your own chest. Your hands reach for the positions they know, but those positions now belong to the other side of the wearer. The same trap catches people watching a knot video filmed by someone facing the camera.
The fix is to choose one frame of reference and stay in it. Either put yourself where the wearer is, by standing behind them, or name every direction by the wearer's own body and translate deliberately. Mixing the two is what produces a knot with its seam showing, or one that falls apart on the last pass. Before you start, button their collar, turn it up, and drape the tie with the seam side against their shirt, exactly as they would.
Stand behind them: the easiest method
Stand behind the wearer, ideally with both of you facing a mirror, and reach around their shoulders with both arms. Now your left and right match theirs, the front of the tie faces away from you as it does on your own chest, and you can tie the knot with your usual movements. Look over their shoulder or at the mirror for the details. This is also the best way to teach someone to tie a tie, because they watch your hands in the mirror doing exactly what theirs will do.
Height is the main obstacle. If the wearer is taller than you, ask them to sit on a chair or the edge of a bed, which brings the collar down to a comfortable level. If they are much shorter, a child for example, kneel or sit behind them. Your arms will be working farther from your body than usual, so hold the crossing a little more firmly than you would on yourself, and pause at each move to confirm the wide end is where you expect.
Face them and translate each move
Facing is quicker when you are in a hurry and the wearer cannot sit down. Talk yourself through it in the wearer's terms, saying their right and their left out loud if it helps, and translate each one: their right is your left. The directions below give both, with the wearer's side first and yours in parentheses. The front of the tie is the side facing you, and the neck loop is the circle of tie around their collar.
Set the starting length
Hang the wide end on the wearer's right (your left) and the narrow end on their left (your right), seam side toward their shirt. Let the wide end hang about a foot (30 cm) lower.
CheckFrom where you stand, the wide end is on your left and clearly longer.
Cross the wide end over
Carry the wide end across the front of the narrow end to the wearer's left (your right), a few inches below the collar.
CheckThe two blades form an X with the wide end on top, nearest you, now on your right.
Wrap it behind
Pass the wide end behind the narrow end, between the tie and their shirt, back to the wearer's right (your left).
CheckThe wide end is on your left again, and the narrow end still hangs straight.
Make the front band
Bring the wide end across the front once more to the wearer's left (your right). Slip a finger under this horizontal band and keep it there.
CheckA band of fabric crosses the knot, facing you, with your finger behind it.
Up through the neck loop
Lift the wide end up from underneath, between the knot and their shirt, and out through the neck loop at the top.
CheckThe wide tip points up toward their chin.
Down through the front band and snug
Feed the tip down through the band your finger is holding, remove the finger and draw the wide end through. Hold the narrow end and slide the knot gently toward the collar.
CheckThe wide blade covers the narrow one and the knot holds on its own.
The shortcut: tie a mirror image knot
If translating every move feels impossible, there is a legitimate shortcut. Start with the wide end on your own right as you face them, which is the wearer's left, and tie the knot with exactly the left and right movements your hands use on your own tie, treating the side facing you as the front. What you produce is a mirror image of the usual knot. For a four in hand it looks the same except that its slight lean goes the other way, and nobody at the reception will be able to tell. A mirrored half Windsor is just as wearable.
The one rule is not to switch halfway. If you start mirrored, finish mirrored. The knot still falls apart cleanly when the wearer loosens it, and the length check at the end is the same. Our main guide to how to tie a tie explains the underlying moves if you want to rehearse them on yourself first, and the half Windsor guide covers the fuller knot often chosen for weddings.
Or tie it on yourself and hand it over
Tying and transferring is the quickest method when several people need ties at once, and it works well for children. Put the tie around your own neck, over your shirt collar or even over a T shirt, and tie a four in hand as usual, but leave it loose. Then hold the narrow end below the knot and slide the knot down it to open the loop wide. Do not pull the narrow end out of the knot: the four in hand is self releasing, so pulling that end undoes it completely.
Lift the loop over your head, put it over the wearer's, and settle the loop under their raised collar. Hold the narrow end and slide the knot up to their top button, then fold the collar down. The drawback is length. The knot was set for your body, so if the wearer is much taller or shorter than you, the tip will land in the wrong place. Adjust by starting the narrow end higher or lower on your own neck and trying again, using our guide to how long a tie should be as the target.
Finish the knot so it sits right on them
Whichever method you use, the last adjustments are the ones people notice. The knot should close over the top button with no gap, but not so tight that it pinches: if you can slide a fingertip between the collar and their neck, it is comfortable. Let the wearer do the final nudge upward if you are unsure, since only they can feel the pressure. Fold the collar down all the way around and check that it covers the tie at the back of the neck.
Step back and look from a normal distance. The wide tip should reach the middle of their belt buckle, the narrow end should be hidden behind it, and the knot should sit centered between the collar points. If you want a dimple, pinch the blade just under the knot before the last tightening. If they wear a vest, as groomsmen often do, the tip only needs to disappear under its front point; our guide to wearing a waistcoat covers the fit. At a wedding, a groom and groomsmen usually look best with matching knots, so settle on one method for all of them; our guide on what to wear to a wedding covers the rest of the outfit.
| Method | Best when | Watch out for |
|---|---|---|
| Stand behind | Teaching, or a mirror is handy | Height; seat a taller wearer on a chair |
| Face and translate | You are in a hurry and they cannot sit | Their right is your left, so name every move |
| Mirror image knot | Translating feels impossible | Never switch direction halfway |
| Tie and transfer | Several people, or children | The length is set for your body, not theirs |
Common mistakes
Switching between frames of reference
Starting the knot from the wearer's point of view and finishing it from yours is the most common way to end up with a twisted blade or a knot that slips apart. Decide before the first move whether you are translating or mirroring, and stay with it.
Pulling the knot too tight
It is hard to judge pressure on someone else's neck, and people rarely complain in the moment. Snug the knot gently, check for fingertip room at the collar, and let the wearer make the final adjustment.
Pulling the narrow end when transferring
When you loosen a knot to lift it off your own head, pulling the narrow end through the knot undoes the four in hand. Slide the knot down the narrow end instead, and keep hold of the knot as you lift.
Questions people ask
Is it easier to tie a tie on someone else from behind or in front?
From behind is easier for most people, because your left and right match the wearer's and you can use your usual movements. Facing them is faster once you are used to translating, or if you tie a mirror image knot. If the wearer is taller than you, have them sit down either way.
Can I tie a tie on myself and then put it on someone else?
Yes. Tie a loose four in hand on yourself, slide the knot down the narrow end to open the loop without pulling that end out, then lift it over your head and onto theirs. Slide it up to their collar to finish. The length will suit your body, so adjust if they are much taller or shorter.
How do I teach my son to tie a tie?
Stand behind him in front of a mirror and tie it slowly on him, naming each move as you make it. He sees your hands where his will be, without any reversal. Then let him try while you watch in the mirror, correcting only one step at a time.
Can I tie a Windsor or a bow tie on someone else?
Yes, and standing behind them helps even more, because a Windsor knot has more passes to translate and a bow tie is shaped largely by feel. The tie it on yourself method works for a Windsor as well, as long as you slide the knot down rather than pulling the narrow end out. It does not work for a bow tie, which closes at neck size and will not fit over a head once tied.
How tight should a tie be on someone else?
The knot should cover the top button and touch the collar, with enough room to slide a fingertip between collar and neck. Tighter than that is uncomfortable after an hour and can pull the collar points out of shape. When in doubt, leave it slightly loose and let the wearer finish.
Sources and further reading
References used for this guide. Each opens the original page in a new tab.
- Real Men Real Style guide to tying a tie on someone else and teaching tie knots Opens in a new tab
- Animated Knots by Grog: four in hand necktie knot, drawn as a reflection and self releasing Opens in a new tab
- Ties.com four in hand knot instructions Opens in a new tab
- The Tie Bar tie length guide Opens in a new tab
Keep reading
Ties and knots
How to tie a tie: the easiest knot for beginners
Learn how to tie a tie with the four in hand, the easiest dependable knot: six steps from your own point of view, then length, dimple and which knot to try next.

Ties and knots
Four in hand knot: how to tie the everyday tie knot
Tie a four in hand knot step by step from your own point of view, with a checkpoint after every move, the collars it suits, and fixes for a knot that runs long.

Ties and knots
Half Windsor knot: how to tie it step by step
Tie a half Windsor knot step by step, with checkpoints after each move, the collars and tie fabrics it suits, and fixes for a knot that looks lopsided or bulky.

Ties and knots
How long should a tie be, and where should the tip land
How long should a tie be? Where the tip should land, standard and extra long tie lengths, how your knot changes the result, and matching tie width to lapels.
Dress codes
Wedding guest attire: every dress code decoded
Wedding guest attire explained from black tie to casual, with what men and women can wear for each dress code, plus color, venue and religious considerations.